By default your survey invitation will always link to the survey in the same language you send the invitation in. Dutch invitations link to the Dutch survey, English invitations to the English survey, etc.
But what if you don’t know which language your contacts speak exactly? You can create a survey in more than 40 languages (it costs nothing extra, so there’s no reason not to do this!), but how will you know which invitation to send to whom?
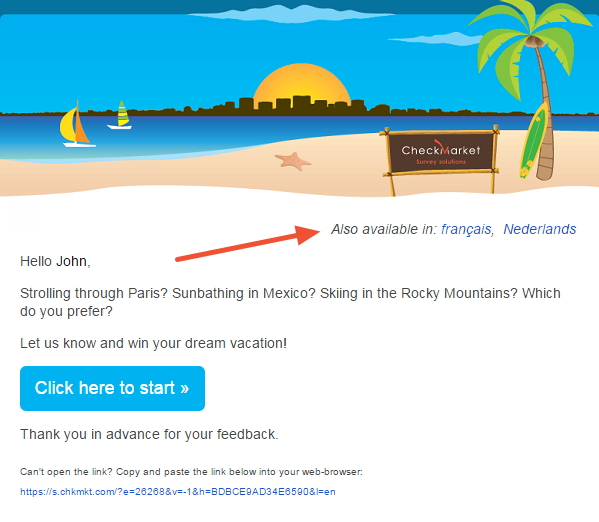
You can decide to send the invitation in one language and simply add the links to other survey languages directly in the message body.
If a contact fills out the survey in a different language than the invitation language, their language code will automatically change into the code for the language they filled out the survey in. You can use this information to update your own contact database.
Adding a variable
The easiest way to add links to other survey languages is by using variables.
You can insert {{contact.surveyUrl.languageSelection}} into your email invitation. This variable will change into the survey link (without language parameter) and leads to the language choice page of your survey. This may come in very handy when you are not sure about the language of your respondents.
The variable {{contact.surveyUrl.otherLanguages}} will show the direct links to the survey in the other available languages.
That way contacts who got the invitation in a different language than their mother tongue can still select the correct language.
You can simply type this variable where you want to show the other language links. Or you can select the option Other languages from the variables drop-down menu in the email invitation.

The variable will change into the direct links to the survey in each available language:
Duplicate the message body in the other language
You can also go a step further and duplicate the invitation body – including the “Click here to start” button – in the other language.
Adding the text is as simple as typing it. To add the button you’ll need to add a bit of HTML yourself.
We recommend adding no more than 2 languages to an invitation using these steps, though.
- Sign in to CheckMarket.
- Add all languages to your survey.
- Click on Distribute and then on Email invitation.
- Type your invitation text in the correct language version, e.g. the English text in the English invitation.
- Add the translations right underneath the original language.
- Change the design as you please.
Now you’re ready to add the button in the other language and let it link to the correct survey version:
- Copy the following HTML code:
- English button:<table width=”100%” border=”0″ cellspacing=”0″ cellpadding=”0″>
<tbody>
<tr>
<td>
<table border=”0″ cellspacing=”0″ cellpadding=”0″>
<tbody>
<tr>
<td bgcolor=”#3369e8″ style=”padding: 12px 18px 12px 18px; -webkit-border-radius:5px; -moz-border-radius: 5px; border-radius:5px” align=”center”><a href=”{{contact.surveyUrl.en}}” target=”_blank” style=”font-size: 16px; font-family: Arial, Helvetica, sans-serif; font-weight: normal; color: #ffffff; text-decoration: none;”>Click here to start →</a></td>
</tr>
</tbody>
</table>
</td>
</tr>
</tbody>
</table> - French button:<table width=”100%” border=”0″ cellspacing=”0″ cellpadding=”0″>
<tbody>
<tr>
<td>
<table border=”0″ cellspacing=”0″ cellpadding=”0″>
<tbody>
<tr>
<td bgcolor=”#3369e8″ style=”padding: 12px 18px 12px 18px; -webkit-border-radius:5px; -moz-border-radius: 5px; border-radius:5px” align=”center”><a href=”{{contact.surveyUrl.fr}}” target=”_blank” style=”font-size: 16px; font-family: Arial, Helvetica, sans-serif; font-weight: normal; color: #ffffff; text-decoration: none;”>Cliquez ici pour commencer →</a></td>
</tr>
</tbody>
</table>
</td>
</tr>
</tbody>
</table> - Dutch button:<table width=”100%” border=”0″ cellspacing=”0″ cellpadding=”0″>
<tbody>
<tr>
<td>
<table border=”0″ cellspacing=”0″ cellpadding=”0″>
<tbody>
<tr>
<td bgcolor=”#3369e8″ style=”padding: 12px 18px 12px 18px; -webkit-border-radius:5px; -moz-border-radius: 5px; border-radius:5px” align=”center”><a href=”{{contact.surveyUrl.nl}}” target=”_blank” style=”font-size: 16px; font-family: Arial, Helvetica, sans-serif; font-weight: normal; color: #ffffff; text-decoration: none;”>Klik hier om te beginnen →</a></td>
</tr>
</tbody>
</table>
</td>
</tr>
</tbody>
</table>
- English button:
- Go to the Source code of your survey invitation by clicking the button with the 2 brackets in it: < >
- Paste the code in the correct spot.
- Click on Save.
- Repeat these steps for the other languages.
If you know your way around HTML you can design your own button. Or you can add regular links to the survey instead of a button (although we do recommend to use a button as it stands out more).
Just make sure you link to the correct language variable and not to a fixed URL:
- English: {{contact.surveyUrl.en}}
- French: {{contact.surveyUrl.fr}}
- Dutch: {{contact.surveyUrl.nl}}
You can provide additional links yourself based on the languages in your survey. Use the specific language code in the variable for this eg. {{contact.surveyUrl.du}} can be used for the language Dutch (informal).
Leave a Reply