Using our Create contact notification you can completely automate your workflow and create a new contact – as well as add it to a survey – each time a certain response was provided.
For example: for each NPS® detractor you can automatically add a new contact to a follow-up survey. In this case the contact’s email address will be the follow-up team’s email address. The detractor’s contact details and comments to the survey are added as custom fields.
The follow-up team immediately receives an invitation to fill out the follow-up survey as soon as someone has been identified as a detractor. The follow-up survey itself will act as a call script for your team.
These workflows were discussed more in detail during our Webinar: Net Promoter Score Webinar: 4 tips to get everybody involved.
You can even take it one step further and use our API to export this follow-up survey data into your CMS or database for future use.
How to set up the “create contact” notification
- Sign in to CheckMarket.
- Open your survey.
- Click on Settings and then on Notifications.
- Click on Create notification.
- Add a notification name. Use a name that describes clearly what the notification does exactly.
- By default the notification is automatically set as Active. You can change this to Inactive if you don’t want to use it right away.
- Add your conditions. When exactly does a new contact need to be created?
- Select type (Question or Respondent Field): should your trigger fire as soon as a respondent provides a certain response? Or does it depend on the metadata you imported along with your contacts? Or perhaps you need a mixture of both?
- Choose the question or respondent field you wish to base your trigger on.
- Select the operator, i.e. ‘equals‘, ‘does not equal‘, ‘greater than‘, etc.
- Select the value of the question or respondent field.For example:

- Select the action Create contact.
- The following screen becomes available:
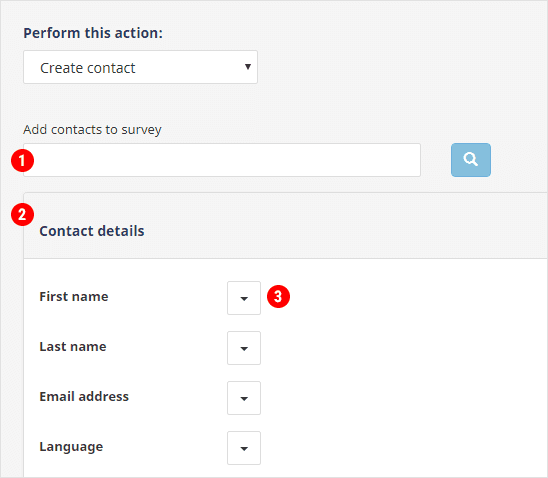
(1) Select the survey you want to add these contacts to. This is optional. You can also create a contact and not add it directly to a survey yet.
(2) Decide upon the Contact details you want to use for these contacts.
For every field you can select which type of information you wish to re-use. This can be a specific question from the survey or any of the metadata you’ve imported along with the contacts that were added to this survey.(3) Click on the arrow next to a field to select the information you want to add to this particular field:
Selection What does it do? Leave empty This field won’t be added to the contact in the target survey. This is also the default selection for all contact details fields. Fixed text Type in the text you want to add. This text will be the same for all contacts. You can also use type in a variable if you need a specific option that is not (yet) available via the other contact details options. First name Adds the source survey contact’s first name to this field. Last name Adds the source survey contact’s last name to this field. Email address Adds the source survey contact’s email address to this field. Language Adds the source survey contact’s language to this field. Street Adds the source survey contact’s street to this field. House number Adds the source survey contact’s house number will be added to this field. Apt/Suite Adds the source survey contact’s apt/suite to this field. Postal code Adds the source survey contact’s postal code to this field. City Adds the source survey contact’s city to this field. Province Adds the source survey contact’s province to this field. State Adds the source survey contact’s state to this field. Country Adds the source survey contact’s country to this field. Phone Adds the source survey contact’s phone to this field. Link to
respondent’s answer summaryAdds the URL for the source survey’s respondent report to this field. This way you can easily link the responses of both surveys. Custom field The source survey contact’s custom field x will be added to this field. When you select this option you will be asked to select the desired custom field. This can be either a number from 1 to 20 or the name you have given to this custom field in this particular survey. Value selected for question Adds the response to a particular question to this field. Once selected you will be asked to select the desired question and/or response. NPS Type (‘Promoter’, ‘Passive’ or ‘Detractor’) Adds the name ‘Promoter’, ‘Passive’ or ‘Detractor’ to this field depending on which score the respondent gave to your NPS question, (e.g. someone who gave a 9 or 10 will be identified as ‘Promoter’).
If you have more than 1 NPS question in your survey, you will be asked to select oneSurvey title Adds the title of the source survey to this field. Survey end date Adds the end date of the source survey to this field. Your survey reference Adds the reference you’ve given the source survey to this field. Notification name Adds this notification’s name to this field. URL to add/edit/remove notifications Adds the link to this particular page to this field.
- Click on Save
Your notification is now active. Each time a respondent matches the conditions you created, a new contact will be created and their contact details will be filled out with the information you selected.
When this contact is added to a survey that is “Live” an email or sms will also be sent automatically depending on your chosen distribution channel.
Net Promoter and NPS are registered service marks, and Net Promoter Score and Net Promoter System are service marks, of Bain & Company, Inc., Satmetrix Systems, Inc. and Fred Reichheld.
Related articles
- Send automatic email notifications
- How to post survey feedback to Slack
- Create a Zendesk ticket based on a survey response
- Variables
- Rename custom fields
- Manage the follow-up of dissatisfied respondents
- The 4 stages of Net Promoter Score (NPS)
- Net Promoter Score Webinar: 4 tips to get everybody involved (Webinar)
- Survey API
Leave a Reply