By using an email notification you’ll immediately be informed when a respondent selects one or more specific answers in your survey. You determine which answers to which questions trigger these alerts and to whom they will be delivered.
Notifications make it easy to complete the cycle and manage the follow-up of dissatisfied respondents.
For example: If a respondent gives a low NPS® you can automatically send an email to an account manager, your support department or anyone else you wish to inform at that time. These people can in turn contact the customer, see what the problem was and resolve it.
You can also set up notifications based on respondent fields. By mixing answer and respondent field triggers you can create complex, yet insightful notifications tailored towards your own needs.
You can edit, activate or inactivate these notifications at any time.
Setting up notifications
- Sign in to CheckMarket.
- Open the survey you want to add a notification to.
- Click on Settings and then on Notifications.
- Click on the blue plus icon

- You will see the following screen:
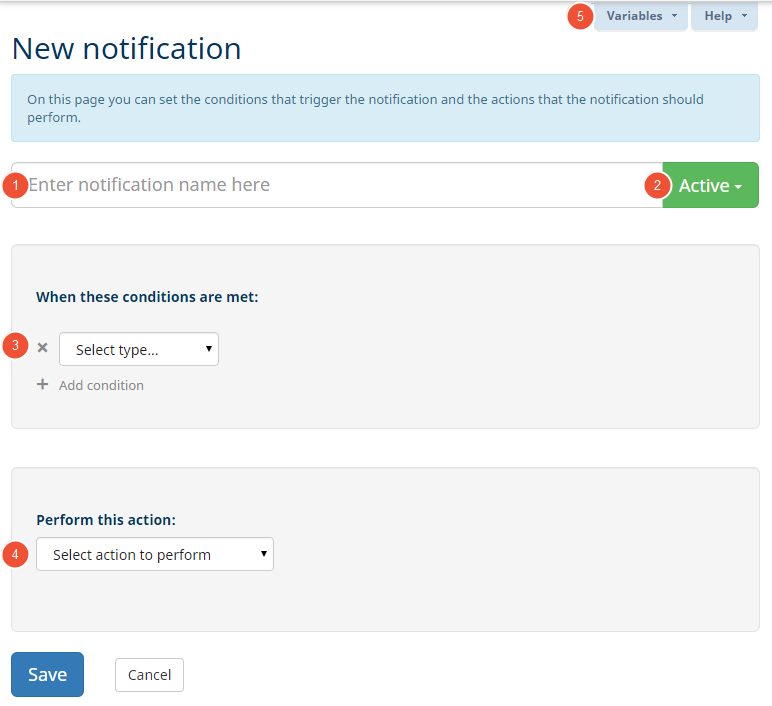
(1) Notification name: Give your notification a name so you recognize it immediately.
(2) Active/inactive: Activate or inactivate your notification.
(3) Conditions: Set up the specific conditions that must be met before your notification is sent. These conditions can be certain responses, but they can also be a custom field you’ve imported along with your group. You can read more about this later in the article. To jump immediately to this part, please click here: Step 1: Adding conditions.
(4) Action: You can send an email, but also a Twitter message, text message, post to Slack, create an API call, etc. This article specifically talks about the action Send email.
- Give your new notification a name.
- Add one or more conditions.
- Select the action Send email.
- Fill out the necessary fields in the email message that appears. You can read more about the email set-up later in the article. To jump immediately to this part, please click here: Step 2: Writing your email message.
- Click on Save.
Your alert is active immediately and will be sent as soon as all conditions are met. Respondents do not necessarily have to finish the survey first.
Step 1: Adding conditions
Conditions in a notification are very similar to conditions in branching. You select the question or respondent field along with the value it must contain in order to trigger an email notification. Using the AND/OR operator you can combine multiple conditions.
The condition screen looks like this:

(1) Condition type
The notification condition is based on two types:
- Question: The answer to an earlier question.
- Respondent field: Data from the respondent (Socio-demographic, address data, custom fields, …).
(2) Question/field
Select from the Select question/field dropdown the question or respondent field on which you want to base your condition.
(3) Operator
Depending on the context you have a choice of different operators to set different criteria like: “is”, “is not”, “contains”, “does not contain”, “greater than”, “less than”, etc. Choose an operator from the Select operator dropdown to further complete your condition.
(4) Value
Choose an answer from the Select value dropdown or fill in the text field that the condition needs to match.
(5) Add condition
Click here to add a second, third, … condition.
Let’s work out an example.
If a customer gives a low Net Promoter ScoreSM you, of course, want to be informed immediately.
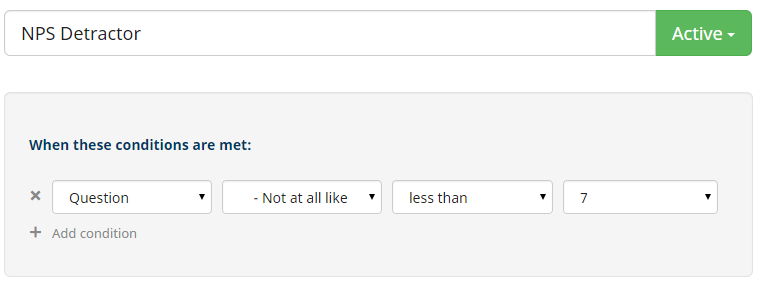
As Type (1) you select “Question” and in the Question dropdown (2) select your NPS question. Make sure you select the subquestion “- Not at all likely – Extremely likely”.
As Operator (3) you choose “less than” and as Value (4) fill out “7” (everyone who gives a score below 7 is a detractor).
Your NPS detractor condition will look like this:
Step 2: Writing your email message
As soon as you select the action Send email an email message will appear that is largely filled out with some standard text and a number of variables. You can find a list of useful variables in the blue tab Variables in the top right corner.
The message itself consists of the following parts:
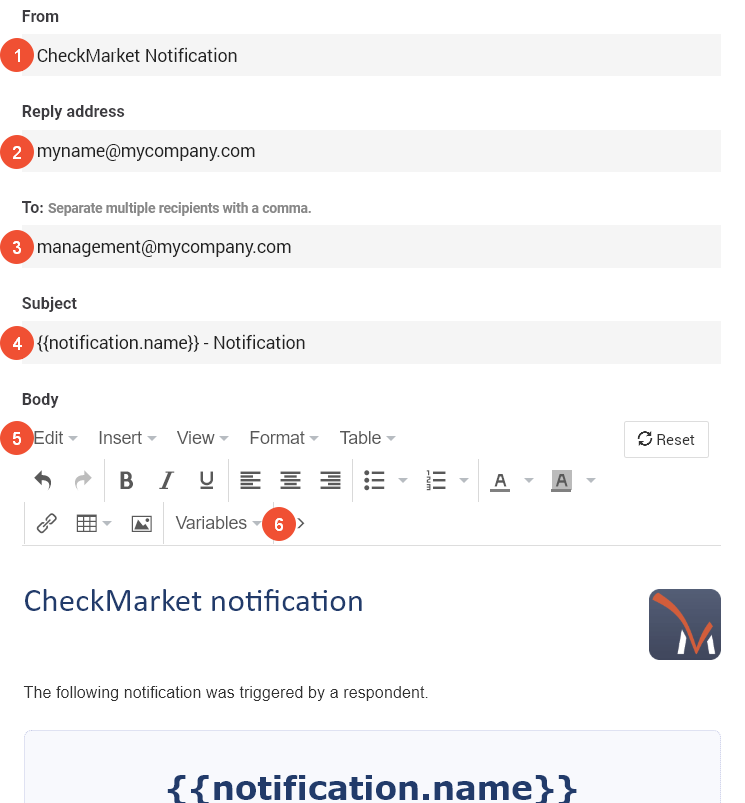
(1) From
This is the name that will be visible to recipients immediately. Who is sending these notifications? Is it your company? A specific department? Put the name(s) here. DON’T use an email address.
(2) Reply address
Out of office messages or direct replies to your notification will be sent to this address.
(3) To
Put all email addresses of people you wish to send your notification to here, separated by commas.
You can also use a variable! For example, if you want to inform the direct manager of a certain department, you can import this manager’s email address into one of the custom fields of your group. Then you can use this custom field’s variable in order to add that person’s email address to the “To” field.
(4)Subject
By default the notification name is used here. You can adjust this to anything that best suits your situation.
(5) Body
This is your email content. You can again use variables to show certain contact values or even specific survey answers! You can add your own banner, add other information, put text in color, etc. In short, the email body is completely customizable so it matches the look ‘n feel of your company or product.
(6) Variables
Under this tab you will find a list of possible variables that you can use in your notification.
For the NPS detractor notification your message could look like this:
You can create a completely custom message that contains all of the necessary information your recipients need to take the appropriate action.
Net Promoter and NPS are registered service marks, and Net Promoter Score and Net Promoter System are service marks, of Bain & Company, Inc., Satmetrix Systems, Inc. and Fred Reichheld.
2 comments
Join the conversationIuliana Genunchi-Castillo - February, 2020
Hi,
Is there a method to embed the survey results into the notification email without having to click on the link to view results?
Nadia De Vriendt - February, 2020
Hi Iuliana
Yes, there is, and it is definitely a good idea to do so!
Simply refer to the responses using our CSL Variables. You will want to use the ones listed under “Respondent answers”.
Good luck!