When you send email invitations via CheckMarket you can show a different banner per person, both in the invitations themselves as in the survey. This banner will be based on a custom field value.
Using that custom field’s CSL variable you can reference to the file saved in that field, and consequently that file will be shown to the contact.
Preparations
A few preparations must be done before you can set the variable banner. First the banners must be imported into your CheckMarket media library and you must put the file names of these banners in a separate column in your contact list.
- Import the different banners into the media library.
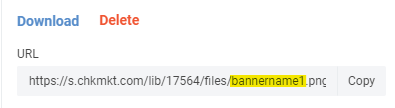
- Note the files names of these banners (or keep the media library tab open while you carry out the following steps). The file names can be found in the URL field, right after “files/” and before the extension (usually .png or .jpg)
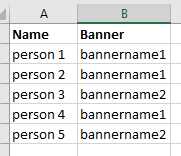
- Put these file names in your excel list in a separate column. Eventually you will have a file that contains a banner name per person (= row) in the file.
- Import the contacts into the survey. Select a custom field for the column containing the banner names, e.g. field 1.
Add a variable banner to the email invitation
- Open the media library and copy the URL of one of the banners you want to use.
- Go to the email invitation and open the source code.
- Locate the code for the current image (it starts with “<img“).

- Replace the part that’s in brackets (right after src=”…”) with the banner URL you copied in step 1.
- Replace the file name (it comes after “files/” and before the file extension .png or .jpg) with the variable of the chosen field.
For example, if you selected field 1 the variable will be:{{contact.customFields.1}}If you’ve renamed the field, e.g. to “banner”, then you can also use the following variable:
{{contact.customFields.banner}}

- Save the invitation.
Add a variable banner to a survey
- Go to the media library and copy the URL of one of the banners you want to use.
- Go to Settings > Appearance and click on Logo / Banner.
- Select URL.
- Paste the banner’s URL here.
- Replace the file name (the part after “files/” and before the extension “.png” or “.jpg”) with the chosen fields’ variable, e.g.
{{contact.customFields.1}}When you’ve renamed the field you can also use that label, e.g.
{{contact.customFields.banner}} - Fill out the alternative text. You can even use the same variable here.

- Click on Select image.
Test the variable banners
In order to see the variable banners in the survey, you can test the survey as a contact.
For the invitation, you open the preview invitation from within the contacts overview via Actions > Mail preview.
Leave a Reply